


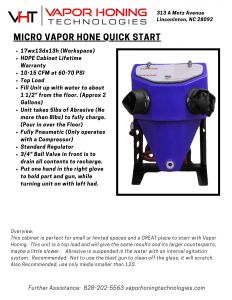
Over View:
This cabinet is perfect for small or limited spaces and a GREAT place to start with Vapor Honing. This unit is a top load and will give the same results and its a larger counterparts, maybe a little slower. Abrasive is suspended in the water with an internal agitation system. Recommended: Not to use the blast gun to clean off the glass; it will scratch. Also recommended; use only media smaller than 120.
Quick Start
- HDPE cabinet life time warranty
- 10-15 CFM at 60-70 PSI
- Fill unit up with water to about 1 1/2″ from the floor. (approx. 2 gallons)
- Unit takes 5 lbs. of abrasive ( no more than 8lbs. to fully charge)
- Fully pneumatic (only operates with a compressor)
- Standard regulator
- 3/4″ ball valve in front is drain all contents to recharge
- Put one hand in the right glove to hold part and gun, while turning unit on with left hand
Micro Vapor Hone Troubleshoot
- 10-15 CFM at 60-70 PSI required
- 2 gallons of water
- 5lbs of abrasive
No abrasive coming through the gun
Test your compressor:
- Set your regulator at 85 PSI
- Turn your machine on
- How much does the PSI drop right away?
- if it drops more than 5-10 PSI, you have a compressor issue
- How much does the PSI drop after 60 seconds?
- if it drops gradually over the 60 seconds, you have a compressor issue
Clogged up Pump
Visit our Knowledge Base page and see the troubleshoot video (Password: 2019)
BenchTop VH450
Over View:
This cabinet is perfect for Hobbyists and personal use. Usage: once or twice per week. When ready step on the foot pedal to begin blasting.
Note: If you don’t feel like you are getting slurry through the gun, try unscrewing the white plastic piece on the end of gun and confirm the Boron Carbide tip inside white piece is slid in flush with the opening. If it slides back it can block the slurry line.
Quick Start
- Stainless steel cabinet life time warranty
- 20-30 CFM at 60-100 PSI
- Fill unit up with water (approx. 8 gallons)
- Unit takes 15lbs. of abrasive (no more than 10lbs) to full charge
- Pour abrasive in over the floor and rinse down
- Plug in 110V GFCI plug
- On/off switch (left switch is the pump and right switch is for the lights)
- standard regulator
- top load
- LED flood light
- Top 3/4″ ball valve to drain just water
- Bottom 3/4″ ball valve to drain both water and media

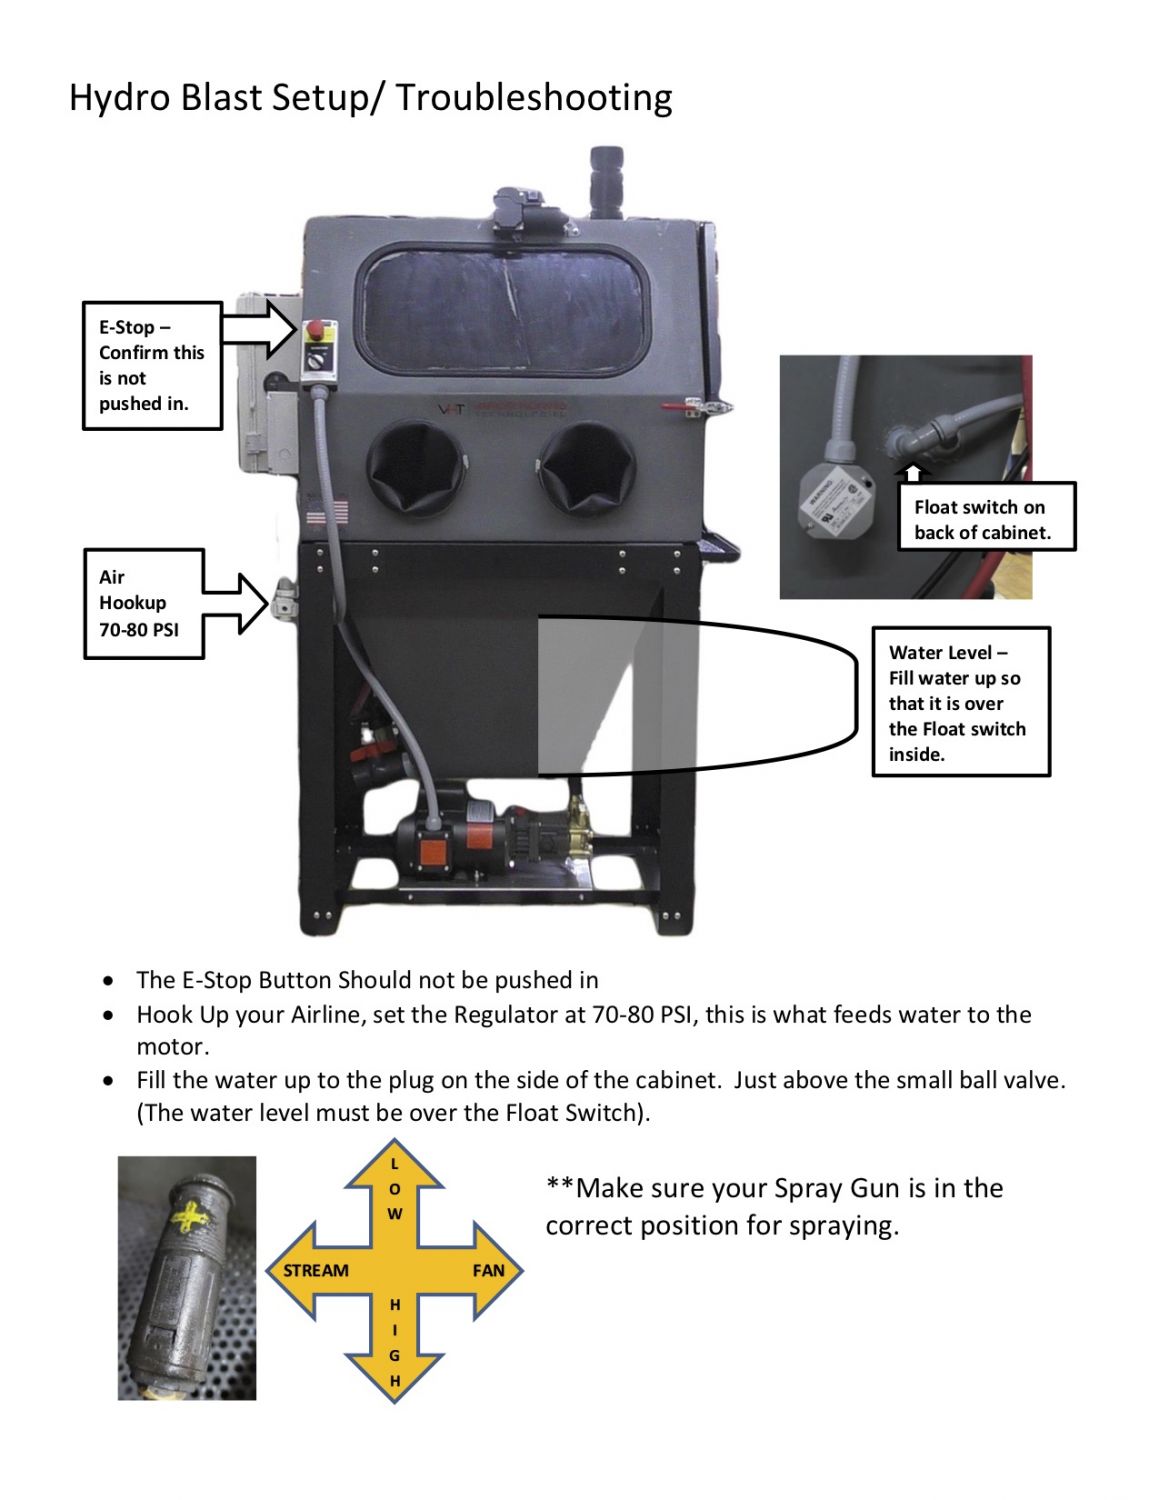
Hydro Blast
Quick Start
- Confirm E-stop to make sure it is not pushed in
- Make sure air is hooked up and is at 70-80 PSI
- Fill the water up to the plug on the side of the
cabinet above the small ball valve (water level
must be over the Float switch)
Troubleshooting
- Check oil level at the site window
- Adjust pressure if need be with the adjuster knob
- Clean out your inline filter and filter bags were dirty
- The E-stop button should not be pushed in
- Heater take about 3 hours to desired temp

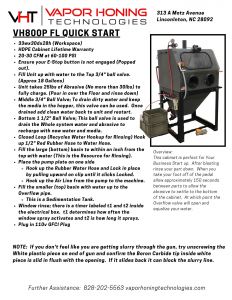
VH800P Base
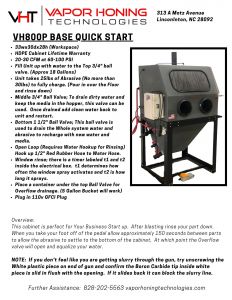
Overview:
This cabinet is perfect for your business start up. After blasting, rinse your part down. When you take your foot off of the pedal allow approximately 150 seconds between parts to allow the abrasive to settle to the bottom of the cabinet. At which point the overflow valve will open and equalize your water.
Note:
If you don’t feel like you are getting slurry through the gun, try unscrewing the white plastic piece on end of gun and confirm the Boron Carbide tip inside white piece is slid in flush with the opening. If it slides back it can block the slurry line.
Quick Start
- 20-30 CFM at 60-100 PSI
- Fill unit up with water to the top 3/4″ ball valve (approx. 18 gallons)
- Unit takes 25lbs. of abrasive (no more than 30lbs.) to full charge
- Pour abrasive in over the floor and rinse down
- Middle 3/4″ ball valve; to drain dirty water and keep the media in the hopper, this valve can be used. Once drained add clean water back to unit and restart
- Bottom 1 1/2″ ball valve; this ball valve is used to drain the whole system water and abrasive to recharge with new water and media
- Open loop (requires water hookup for rinsing) hook up 1/2″ red rubber hose to water hose
- Window rinse; there is a timer labeled t1 and t2 inside the electrical box. t1 determines how often the window sprays activates and t2 is how long it sprays
- Place container under the top ball valve for overflow drainage (5 gallon bucket will work)
- Plug in 110V GFCI
VH800P FL
Overview:
This cabinet is perfect for your business start up. After blasting, rinse your part down. When you take your foot off of the pedal allow approximately 150 seconds between parts to allow the abrasive to settle to the bottom of the cabinet. At which point the overflow valve will open and equalize your water.
Note:
If you don’t feel like you are getting slurry through the gun, try unscrewing the white plastic piece on end of gun and confirm the Boron Carbide tip inside white piece is slid in flush with the opening. If it slides back it can block the slurry line.
Quick Start
- 20-30 CFM at 60-100 PSI
- Ensure your E-stop button is not engaged (popped out)
- Fill unit up with water to the top 3/4″ ball valve (approx. 18 gallons)
- Unit takes 25lbs. of abrasive (no more than 30lbs.) to fully charge
- Pour abrasive over the floor and rinse down
- Middle 3/4″ ball valve; to drain dirty water and keep the media in the hopper, this valve can be used. Once drained add clean water back to unit and restart.
- Bottom 1 1/2″ball valve; this ball valve is used to drain the whole system water and abrasive to recharge with new water and media
- Closed loop (recycles water hookup for rinsing) hook up 1/2″ red rubber hose to water hose
- Fill the large (bottom) basin to within an inch from the top with water (this is the resource for rinsing)
- Place the pump plate on one side
- hook up the rubber water hose and lock in place by pulling upward on clip until it clicks locked.
- hook up the air line from the pump to the machine
- Fill the smaller (top) basin with water up to the overflow pipe
- this is a sedimentation tank
- Window rinse; there is a timer labeled t1 and t2 inside the electrical box. t1 determines how often the window spray activates and t2 is how long it sprays
- Plug in 110V GFCI plug
VH900
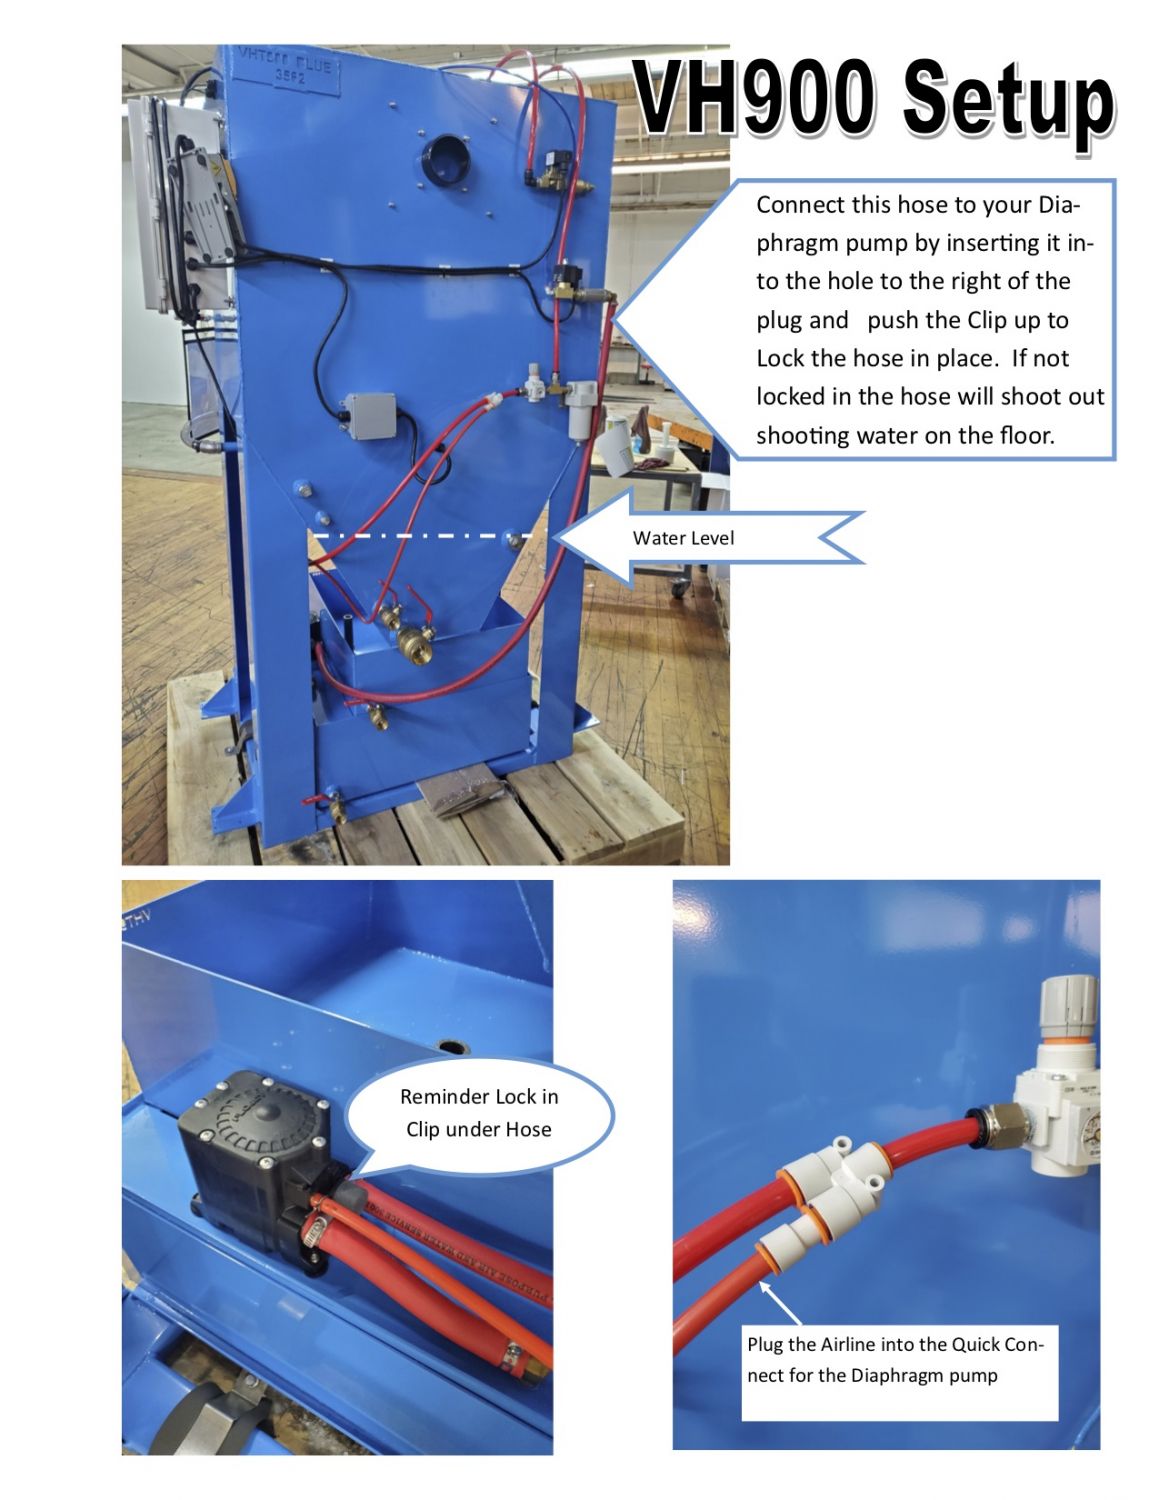
Quick Start
⇐Follow the instructions on the picture. Make sure the hose is connected to your Diaphragm pump. If it is not locked in place, water will shoot out onto the floor and could potentially hurt someone.
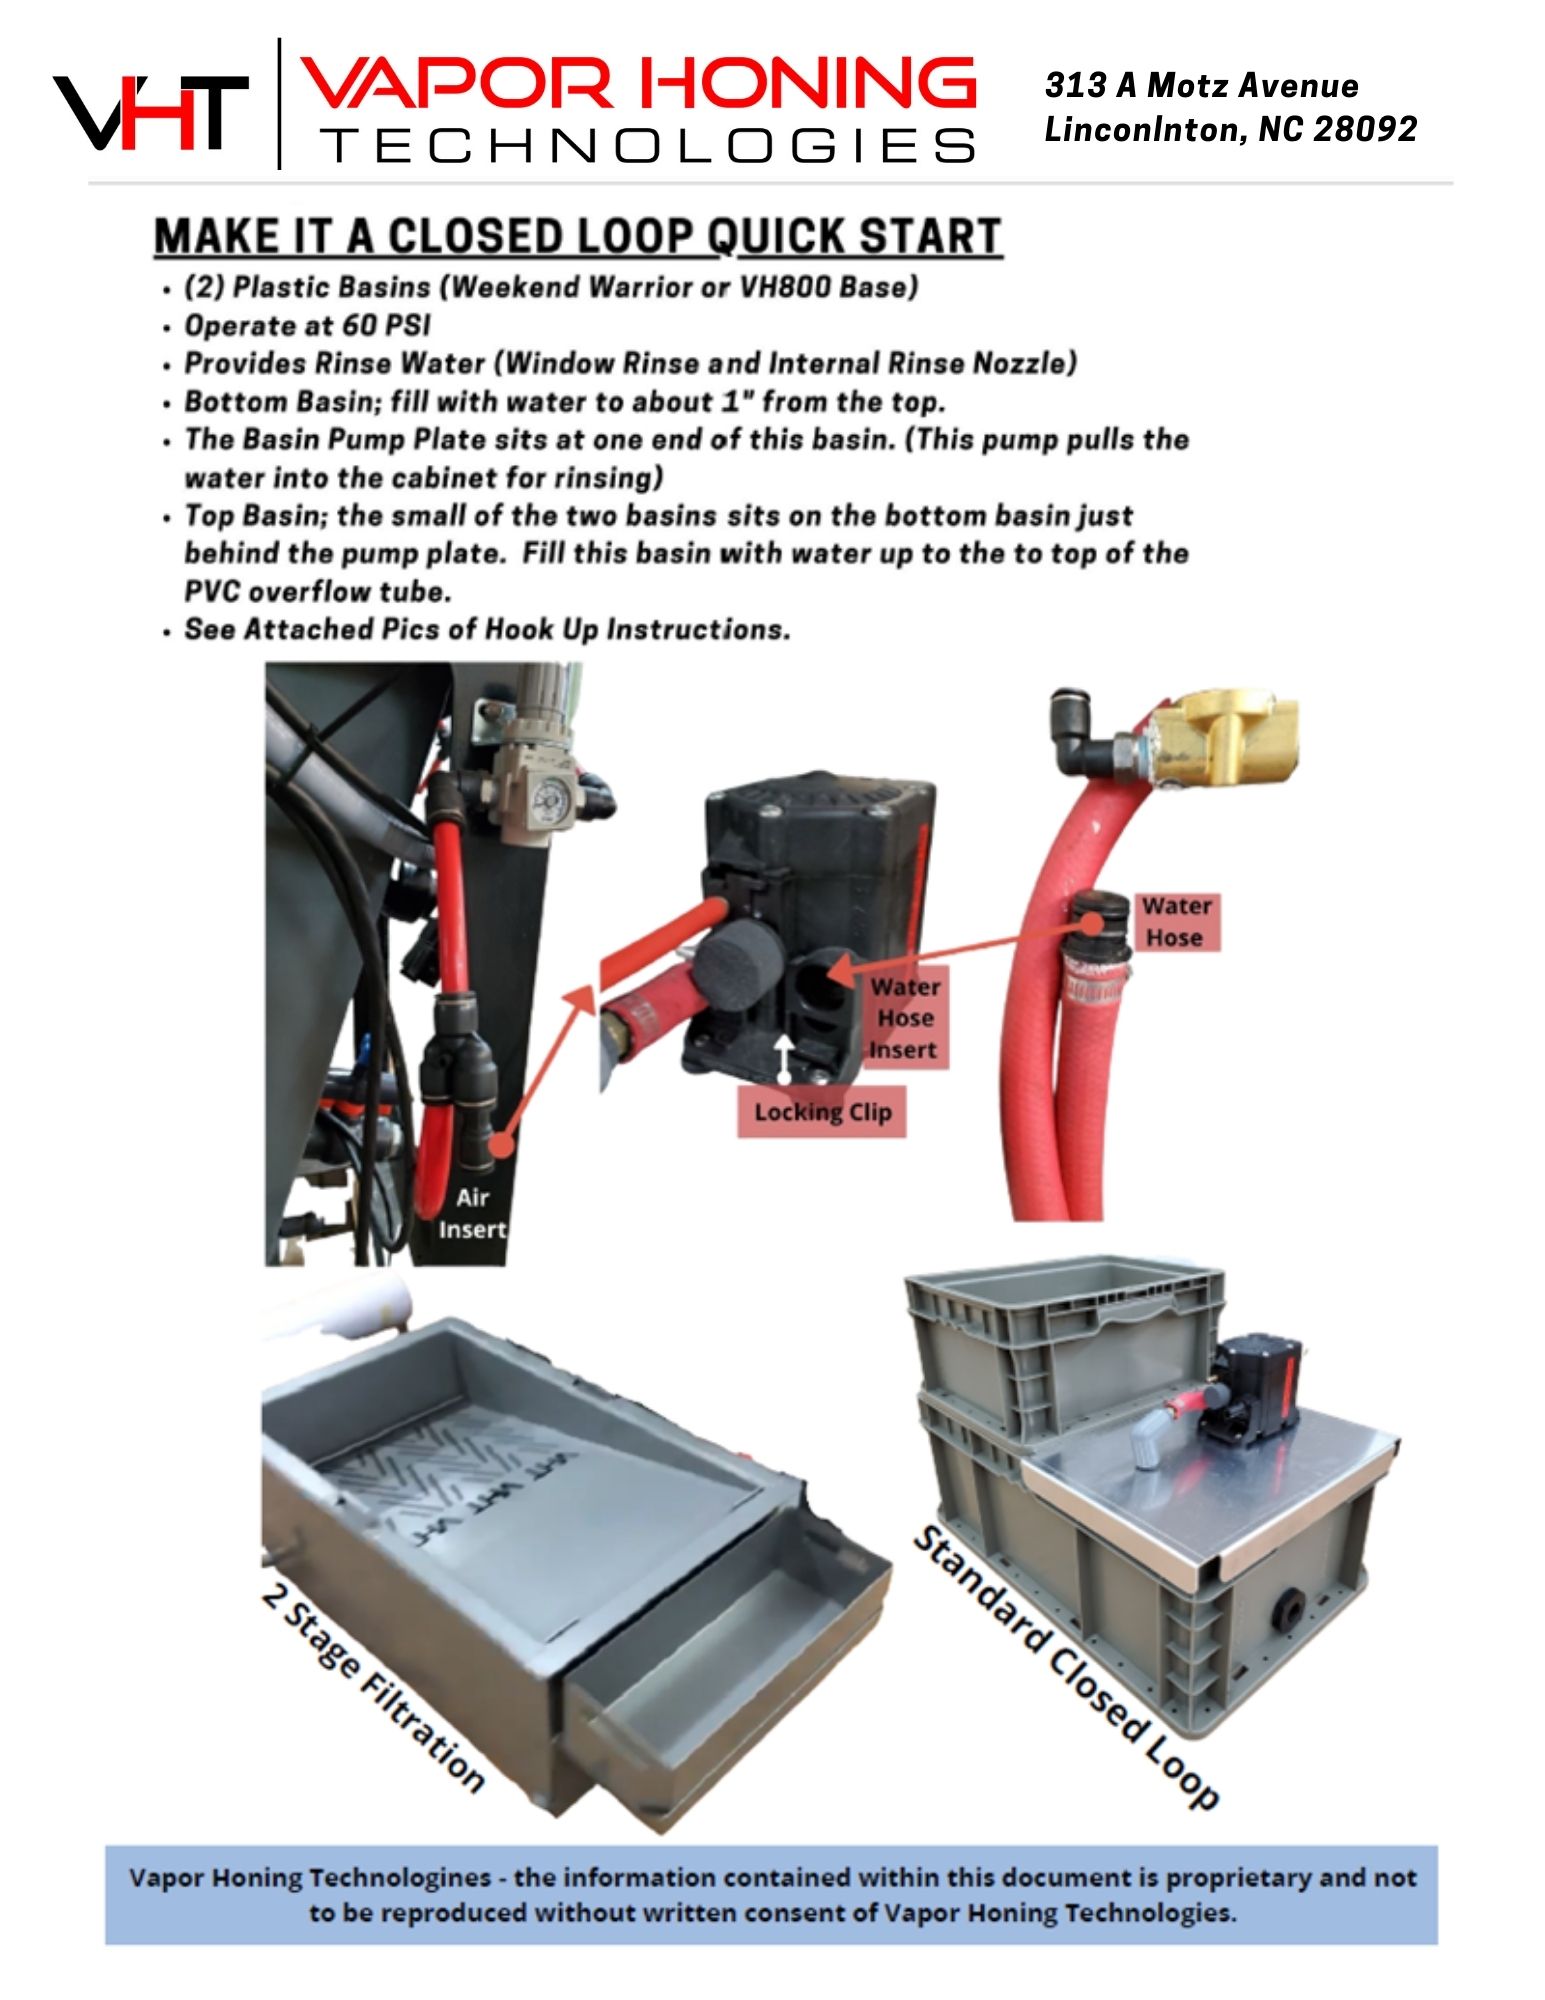
Make Your Machine A Closed Loop
Use this picture on the right as your guide line
- (2) plastic basins (Weekend Warrior or VH800 base)
- Operate at 60 PSI
- Provides rinse water (window rinse and internal rinse nozzle)
- Bottom basin: fill with water to about 1 inch from the top
- The basin pump plate sits at one end of the basin (this pump pulls the water into the cabinet for rinsing)
- Top basin: the small the two basins sits on the bottom basin just behind the pump plate. Fill this basin with water up to the top of the PVC overflow tube
- See picture on the right for hook up instruction
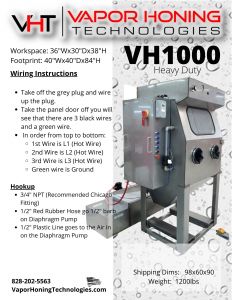
VH1000 HD
Wiring Instructions
- Take off the grey plug and wire up the plug
- Take the panel door off and you will see that there are 3 black wires and one green wire
- In order from top to bottom:
- 1st wire is L1 (hot wire)
- 2nd wire is L2 (hot wire)
- 3rd wire is L3 (hot wire)
- Green wire is ground
Hook Up
- 3/4″ NPT (recommended Chicago fitting)
- 1/2″ red rubber hose go 1/2″ barb on Diaphragm pump
- 1/2″ plastic line goes to the air in on the Diaphragm pump
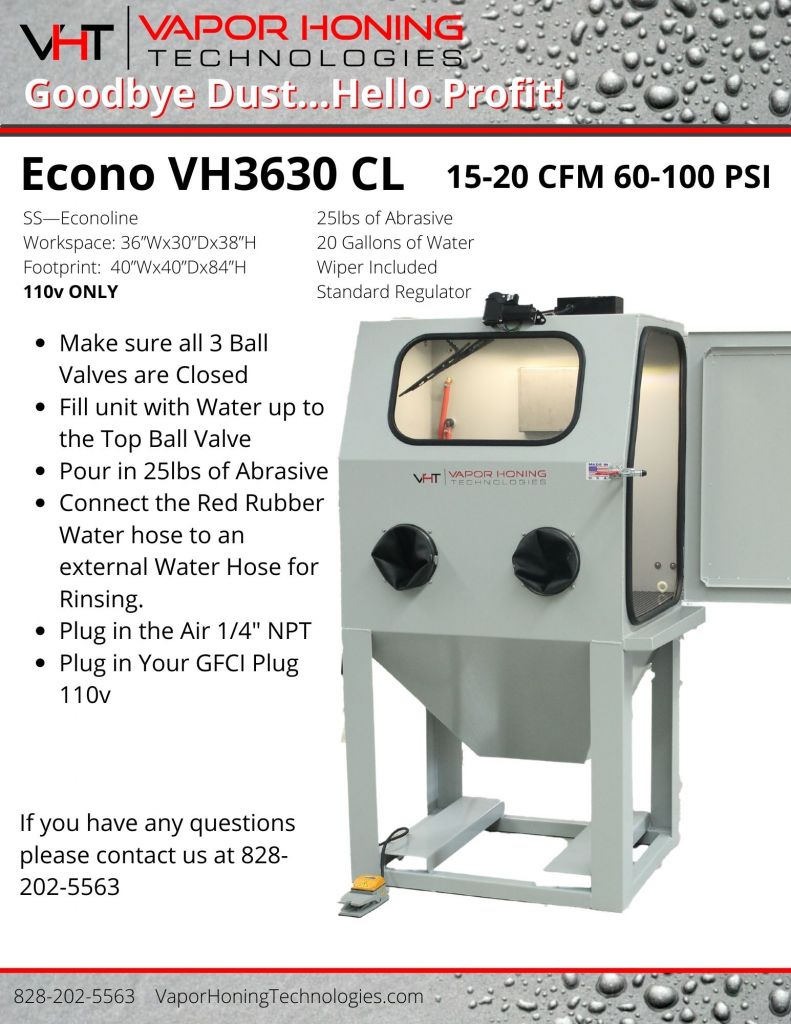
Econoline VH3630 CL
Quick Start
- Make sure all 3 ball valves are closed
- Fill unit with water up to the top ball valve (approx. 20 gallons)
- Pour in 25lbs. of abrasive
- 15-20 CFM
- 60-100 PSI
- Connect the red rubber water hose to an external water hose for rinsing
- Plug in the air 1/4″ NPT
- Plug in your GFCI plug 110V